Here we go again.

The reverb and sustain thing has so many possibilities and this is a good one that may enjoy a certain revival. Hints at the old speaking tubes of Zeppelins and an age before even the carbon microphone.

Also I kinda forgotten about the whole DIY thing around tape op and I wish we could get the mags here as opposed to all those digi store bought equped and ready to have the biggest best monitors magazines that just feed a blinded addiction to having been told what to do and how money and the right source of mojo can solve all our problems…of self.
what is it?
oh, thats what it is.
From this thread
Coupla 600 ohm dynamic mic capsules, not necessary to dismantle your sm57’s I’m sure, and some garden hose plus a headphone driver amp and a preamp with a little EQ… though they do mention a little post high added in… and you have a modern version of a speaker tube… or two tins and some string.

I also found this place on my searches to understand carbon mics and it was thoroughly entertaining and I want his books.

Isn’t this just kinda weird. K.I.S.S.
eek!

Workshop spaces…untidy.

I had a chance to do a bit of a cleanup before christmas but since then I’ve been making stuff all over the place so I’ve just made everything just one big mess and have ended up working outside on the pathway. So before I go and tidy everything up and maybe even make some more shelves here and there I thought I’d photograph it all so everyone who reads this can see how potentially untidy I can get.

But I suppose that while you’re waiting for all the photos to upload I can briefly say whats been going on for the last few days. Well, the money thing has ended and the flows back on mainly from sales on Trade me but my gallery man decided to flick me a few hundred on tick as well… so I’m basically set for another month, all bills paid, enough to finish up most of the projects and keep myself in coffee and cigarettes… if I’m careful, what more could one ask for?

So theres also a bit of work in the pipeline with some stuff for the lovely Sheena who sells stuff at Titirangi market and maybe some electronics for Jamie Bowen the comedian. So there all back from holiday and my services are required…. good!

Yesterday I went out for a wee shop to surplustronics and got a small bag of needed stuff and dropped in at Ben’s later and got a bunch of telephone carbon mics to play with. But I also dropped into the tool barn, in Panmure, earlier and got a choice little forged, as in blacksmithing, bench vice and a small box of brass screws, N04, which are quite hard to get these days. He also had a box of technotool wood lathe accesories and they are just the kind of stuff I need to get my own monster wood lathe together ’cause I’m actually quite keen to make up some shapes and do some metal spinning. I offered him a swap for a swedish small model makers unimate lathe I picked up years ago and his eyes absolutely lit up and he was real keen. The box of stuff was priced at 250.00 and thats fine by me and I know these unimates are getting horrendously high prices on Ebay these days but I got it for free so anything is a bargain really.

Should have loaded by now. One other thing but I’ll wait till the end and it may make more sense by then.
PC room
This is where I am now and it’s dismal how underutilised this room is. It’s in the house and one day I’ll move out completely to my sheds and lean to’s.
lean to.
Then it’s out of the house, Mums, and this is my lean to shed where I do most of the metalwork but have recently been doing just about everything in here as it’s the only good sized space thats under cover. I do like floors… big and empty, and work alot kneeling and sitting on my ass.
House.
This is what the lean to leans on…my house, upstairs is where I sleep ( you can just see the sloping stair beam) and to the left is the room which I’ll tidy up to get painting some pictures and eventually the place where I’ll keep all my paperwork but on the floor right in front is kinda my musical instrument storage space. Hard left I’m going to put some shelves in and theres quite a big space above where I’m going to hang the bigger instruments.
Garage entrance
Now were entering the shed proper and the floor is strew with tools that should be put away but because I’ve been working in the lean to I just unfurl a power cable and pick up and return all the tools to the floor by the door.
electro workbench
This is supposedly where I do all the solid state electronics but its not been tidied in quite a while and needs a thorough going over.
Storage?
And hard in behind the electro SS bench is just loads of stuff that needs a proper place to be stored and not just clutter the place up.
looking back
From the end of that room we see the tube bench up against the window which is suddenly much in my mind these days as SS just means lots of buying new parts whereas tubes is just picking and choosing of the parts already rummaged and chucking stuff together. Much more mechanical and chunky type stuff… plus it’s alot more dangerous.
knives, cutters, clamps, chisels, rulers, pencils, drills, etc.
Then it’s through the next door and my last bit of floor that was useful for making things but has recently just become a tool depository.
mostly tidied actually, just needs clearing and shelving.
Back wall behind the main working bech is the place where all the bits and bobs go.
main bench
This should be completely clear. Its the main bench for doing mostly clean work with really sharp stuff. But it’s littered with just about finished stuff… and more tools that should be put away.
negotiate in the dark? yes' of course.
This shows the floor, a little, of the main thoroughfare between outside and the main workshop and it’s completely littered with stuff. When I’ve finished at night and turn the lights out I have to negotiate this space in pitch black and I leave little footholds where over time I’ve been able to remember. I know thats kinda good to be able to do things like that in the dark, spatial sense relative to body etc, but it’d be a lot better if I was just tidy.

Now I’m going into town to get a photo of an old ham radio sitting on a toilet cistern in a cafe, and get some photos of buildings vying for attention, old and new, to do some paintings then stop into Panmure with a rusty old bunch of swedish steel to get some much nicer and cleaner English steel.

I was going to talk about the valve radio, in the cafe, and the late great Fred Nachbaur… but I’ll get the photos first. Meantime go look at his site.

Or have a good look around here at this wonderful site. I want his books!

Karens Ballon.

I’ve approached the Vit S guys about working with fraulien Karen and doing “Stilled life with intercontinental remote controlled mail dirigables” but have yet to recieve a reply but thats not stopping me going forward and building an instrument for her… if we end up doing something.

Might be a case of the curators running the farm and not listening to the little piggies in the mud, but whats so unusual about that these days?
So this is the instrument so far.
mailish dirigablitus
It’ll have microphones attached to the top…
early radio anyone.
and each mic on a momentary and then mixed with a kinda wind machine thing which is a white noise going though a filter similar to a wah which is movable bandpass. Once mixed the signal is split to a bypass and a set of eight strings, tuned to a note each of a known scale, or otherwise, which has an amp feeding a sustainer to make the strings vibrate. This is picked up by a normal magnetic wire wound guitar pickup, a humbucking one split into two, and then the output mixed with the bypass signal.
Then it going into another amp, and a bypass, that sends the signal out through speakers onto the spring mounted sheet, which has piezo’s attached to it and the signal is mixed and goes out.

Karen would stand behind it with the mics at the right height and be able to push the momentaries for each mic, just like a stewardess on a zeppelin, while also having the two controls of the windmachine to play and the mix knob to balance or unbalance those two variables.
The signal can then be sent, or partial parts thereof, to the strings where notes will set particular strings in motion to be picked up and mixed again, another knob, and then the reverb does it’s job which again the original signal and the reverb are controlled with one knob. While all this is going on the string tuning is accesible while the strings themselves can be reached as also is the sheet of the reverb.

So it’s all for a specific show but if that doesn’t eventuate, and I have no idea whether it will or not, it doesn’t matter because the exercise of deciding to do something for someone else to use, who I’ve watched performing a little bit, takes me away from what I’d normally do for myself. With instruments I build to play the inter-connections between elements are obvoius to me but, and I’ve let others play my instruments to gauge this, they aren’t so obvious to others, so in this instrument, kinda designed for a specific person and use, has allowed me to approach things from a completely different angle.

The vitamin S thing has even had workshops about different ways to approach performance, taking on personnas, reviewing storylines, etc and here I am using the approach to distance self from self to build the instruments… and I like it.
Apart from this I’ve mostly finished the little tube amp.
little tube amp, LTA.
and it was a real chore, but an enjoyable one, making all that stuff fit into such a tiny space. All I’ve got to do now is put on the grill then rip it down and sand the shit out of the outside and then oil it up. I contemplated carving the rimu and oak so that it looks like its a squashed carton with ripples and folds all the way across and around it but I don’t think I can be assed with any of that and I’ll just put a grill on the front and that’ll do until a quieter time when my workshops are tidied up and I’m well beyond this super mess I’ve created with these weeks of building and having no cash.

But this Comedian fellow may be good fun, pun intended, because he wants to use a digi looper and a bunch of instruments for his act and it seems like I’m just the man to sort out his kit for him. For the difference of the price of the looper he was looking at, an RC20, and the price of that which will do, the RC2, I should be able to mic, mix and make simple to setup, what he needs to do his job.

I find it really interesting that to work conventionally and buy mic’s preamps and mixers to be able to get signal into the loopers is a very tedious, space eating and expensive task for people who want to use loopers… unless they are already in a band and have acess to this stuff and the accepted setup time it takes to get it all together.

What the problem is is that the digi loopers aren’t only appliable to the band on a stage conventionality and they are somewhat of an anachronism to it, even though they are developed for it. They are more akin to the ipods and blackberries that the youth of today take for granted and as such they, the loopers, are becoming of interest to many outside that hallowed world of loud bands and sweating fans and afficienados.
But the trouble is the interconnectivity of the ipods and suchlike, the bluetooth thing, is not there with the loopers which are still encumbered with the 6.5mm jack and the metres and metres of cabling and big butty gear of the machismo world of the boy bands… but the looper actually shares more in common with the cellphones and ipods. It’s kind of like a modern sports car that they’ve put tractor wheels onto.

Now with someone like a Comedian wanting to use a looper it stands to reason that having half an acre of patch leads and a rack of equipment to do his job is just complete nonsense but then he finds me, or I found him because I was the one who had the nutty old Italian harmonium for sale, who has been working in vitamin S where the conventional musical world is still somewhat prevalent but the idea of putting three people together into a small space with there own gear and doing it quickly has alot more akin to a vaudville presentation or school play than it has to ticket buying and 164 trucks worth of stuff for a U2 show.

Lucky me huh? though I’m not even contemplating a commercial venture making lots of little simple amps and preamps and mixers I do know that commerciality has to be completely stupid if they haven’t seen the potential market that is slowly growing into something that needs feeding.
I’m quite content to see it as an interesting set of problems that need solving and I’m quite glad I’m somewhat in the right place at the right time to have a go at it and as usual what the market gets, a few had years before and are already doing something else.

Harmoniums maybe? So I fixed the other one, the Italian job, and thats made me somewhat interested in the real McCoy eastern one that I have for sale on Trade Me.
outerish
As you can see it’s quite the interesting piece with all those keys. springs and valves.
innerish
While inside it’s rows of reeds and chambers and stops.
But then again, I have got the old church one to keep me busy if I ever need a reed fix.

microphone capsules

I’ve been hooking anything and everything up to the amp and seeing if it works as a microphone and mostly they do. This thing below confused me because I couldn’t get anything from it, but I had two so I took one apart.
planar ribbon
And after pulling it apart I realised it was a dynamic mic. The two outer discs are magnets and the inner diaphram has a coil on it so it therefore works just like a dynamic mic where the coil moves in the magnetic field and so a current is generated in the coil. Then I published this picture looking for more info, than I actually got, but I was told that it’s a planar ribbon mic. My God, I own a ribbon Mic.

And it makes sense as the coil is actually an aluminium foil ,whether cut or etched is beyond me, but it is a ribbon of sorts and it is suspended between two magnets and the one reference of any use, on the net, I could find of planar ribbon mcrophones stated that they are much sturdier than regular ribbon microphones.

So far several capsules I’d thought were carbon were actually dynamic and so I decided to hook a speaker up to the input of my amp and lo and behold even that transduced signal.

Now I’ve just gotta think up way to mount these things in various ways to make them interesting.
Very good article on microphones.

Actually, as well today, I fixed an Italian electric harmonium that I’d sold on Trade me to a Comedian…literally, the guy does an act using musical instruments, and as I was fixing it I realised how well thought out it’s construction was and I realised the uses I could put it to…deconstructed.
But it wasn’t mine anymore so, oh well. One of the reeds wasn’t vibrating and upon pulling it apart I could see that the reed wouldn’t go into it’s channel and was getting caught up on an edge so I had to remove the reed box and adjust it so it would fit properly. Trouble was that the keys had rods off the ends that had a foot of sorts on the end that covered the hole that entered the reed box and these feet lifted off the hole to sound the note but to remove the reed box and get acces to the individual reeds I had to lift the keys as a whole. It seemed that the Italians had nailed this key frame to the backing board and all I could do was slowly file off the nail heads and lift the whole assembly. Very tiresome…. until I realised that the knob on the end of the harmonium body was an axle that could be pulled out and would allow all the keys to be removed. Good golly, I could have kicked myself at my own stupidity if I wasn’t so pleased with these Italians cleverness that was resolved down to absolute simplicity. It’s like that sometimes when incredibly well engineered stuff is not supposed to be that simple or ones own version of stupid simple takes precedence over divinely simple so one misses the obvious. Anyways after that it was plain sailing removing the reed box and tweaking the riveted reed so that it didn’t hit its channel edges and swung easily in and out. Engineering at it’s best is simple and things can be fixed, as opposed to removeable, but still be tweaked.
Italian electric harmonium
It’s actually got me thinking about the real fair dinkum indian harmonium, actually Pakistani as its made in Dhaka, that I’ve got for sale on trade me. It’s got to be full of reeds and stops and that that kinda stuff but then again I’ve got the monster harmonium out in the garage and once I get a little space I’ll take all my reed fantasies out on that… or be old enough then to just refurbish it and keep it in all it’s glory, Yessiree!

New mad instrument

Kinda started on something yesterday which is kinda simple but quite involved at the same time.

I was on the net yesterday morning and found an interesting thread at experimentalist anonymous about a guy using a speaker with the cone removed to drive strings somewhat like a sustainer but closer to the ebow.

That got me going because of something else I saw a few days ago which was on a thread at DIY stompboxes which was called transduce anything.
dodo
This thing has a small lip on the front of the speaker, which seems to be just that, a speaker, which is most probably a little soft and neoprene or somesuch, and then the frame with legs some sort of resiliant, or compliant, plastic so the two together act like a shock absorber and transfer the movement of the speaker cone and its winding.

Kinda clever really and it brought me to the idea of using it as a plate reverb driver. so I was reading around and about on string and plate drivers so it’s only a short step to devise an instrument that combines the two. Oh, and some guy somewhere or other was building some sort of multi stringed harmonic thingy with sustainer type drivers. This is where you take apart a pickup and rewind it with thicker gauge wire to make 8 ohms then drive it with a small amp and the changing magnetic field of the magnets drives the strings.

Same principle as the sustainer except the sustainer works with a pickup, on the same set of strings, and forms a kind of feedback system, whereas the harmonics thing has another outside signal fed in and then only the strings tuned to the frequency, or harmonic intervals, will sound but the drive system is the same.

So, of course, I start thinking about merging the two so there is a set of strings that have a driver on them but this is fed by both an input signal and a pickup on the other end of the strings. The we have the plate reverb to accommadate so the signal from the strings goes to another amp which drives a speaker close to the plate, or sheet because plates don’t flex enough in the sizes I’m into, which is pcked up by piezos and out into the real world… with maybe a little feedback to the string driver. And the input signal? well, two of them, actually maybe three, outside source, noise maker I’ve recently found which is a white noise generator into a bandpass filter and a microphone.
carbon
This is an old telephone carbon mic capsule I tested into an amp yesterday and actually gave quite good results, to the left, while the other two still need work because they sounded like crap but may just need a little voltage and the proper impedance to be fed into.
I cut out a holder and then attached it with springs to an old speaker surround to get that 30’s broadcast mic feel.
string driver
And this I made last night as well. I’d found a site that shows you how to build an 8 ohm driver from an old guitar pickup and so I kinda did what I thought was easiest. The pages said 112 times winding around the core of .2mm wire and the insulated wire I had was about .2mm, give or take a few tenths of mm, so I got some neodenium magnets and cut out some PCB bard, drilled it and glued the lot together with cheap chinese super glue. Then I wound the wire I had around it 130 times, just to be safe, and got about 30 ohms which was too much and so I took a bunch of winding off and ended up with 16.9 ohms which is close enough. This all means my wire choice was quite a bit finer than .2mm so I’ll get a good high frequency response but it won’t take much drive before it burns out but I have neodenium magnets so the transfer of electrical energy to magnetic energy should be very good and won’t need as much power anyways.

Thats the thing with kinda experimental noise making, good enough can often be better than going for absolute and proven results and lead into much more interesting developments.

So essentially the instrument has a frame about 250 x 1500 that stands up right and this holds the spring tensioned sheet reverb. Atop this frame is the microphone. On the front is a barbacue dish, which is half a sphere, which has the frame to hold the strings vertically which the tensioning knobs at the top end. On the back, halfway up is the control panel which sets all the signal levels and allows mixing of the various signals.

So it’s kinda etherial voice, given the kinda crackily telephone mic, mixed with the wind sound generator played into the strings for harmonics and drone then played into the plate, with feedback at the strings and plate, then out into the world at line level and one small internal speaker aimed at the audience.

So I’m thinking about this festival gig and doing it with the German woman Karen and she does voice stuff so this thing, instrument, will be for her to play with. I watched her play one of my other instruments, and she had no idea what was going on when she twiddled knobs, so its kinda designed with that in mind, that knob twiddling will bring results.
blown dirigable
Kinda like this but with a sheet of something in the frame so you can see how playing the sheet and the string will be accesible by the player standing behind it…

And I’m hoping that I’m out there.

So I’ve basically nutted out the schematic for the tube amp and I’ve done all the mechanical stuff so it’s full steam ahead wiring it all up. All the power supply stuff, filaments, grounds and most of the output pentode wiring is point to point and sits under the preamp board. Just a little more to do, well actually the whole other side, opps I forgot, which is all the wiring for the pots… but then the board goes in.
So heres a photo without the board.
chocka
and heres one with the preamp board covering it up
moolie
Now if I can go through my old stuff and find one more 1 Meg log pot I’ll be able to start on the control stuff.
The first attempt at etching a board failed somewhat as the sharpie ink tends to not like long traces because each time you lift off the pen you get a slight edge that doesn’t cover so I did this one using acrylic screenprinting fabric ink with a small brush then tidied it up with the edge of a knife then set it with the heatgun and it worked well. No eating through at all. I now use a fairly high concentration of hydrogen peroxide to hydrochloric and it eats out a board in under two minutes… Bit dangerous though. Chlorine gas isn’t very tasteful.

Because it puts it out there.

Okay, suddenly I need to get my shit together and learn my chops.

Well not really but at the least I have to look as if I have. Actually the answer might be that being such an avid firestarter it’s time to learn the firemans ropes if only to create bigger and better fires.

On one hand theres a bunch of projects that need finishing up and getting to the reliable stage and on the other hand theres one or two things that need to be started from scratch…maybe.

The drone box, drone lab actually, from casper electronics is top of that wish list but with about 20 pots it ain’t cheap and I’m cash strapped.
I just love what this guy does, hes a wonder
But what is required is a parametric equaliser because I’m such a fan of delays and those babies, along with loopers, seem insistant on finding a rooms fundamental resonance and then proceeding to annoy this mind attuned to subtlties by constantly wanting to make it into feedback so I need something to isolate that frequency and cut it out… or get instant feedback when I want it which also be a bonus…’cause I’m actually quite the fan of this precarious interloper.

So it’s all because Vit S has a festival coming up and I’d tried for it but got a reply that I was late but tonight I saw the man and he said if I want in then I’m in… with a good chance!

Thats good enough for me to drop all sense of responsibility and go even harder to be totally and scarilly funky in the old horror movie sense of sound production.

The Tower of Ohms and the Tunnel of Shove are about to be… discovered, unabated and hopefully unleashed…watch this space avid imbibers of sonic reflection.

Why do I do this stuff? (rhetorical)

Yesterday I spent almost the whole day doing a little fitting of my lastest amp chassis to its box and this necessitated one or two changes to things so they fit better. One of them was changing the old fashioned 50uf + 50uf cap from hanging off the botton, next to the output tube, to being mounted on the top of the chassis with the transformers. The reason for this is that I read the Valve Wizards grounding tale and realised I needed to isolate the grounds on the twin caps from the place I was originally going to put them. The basic reasoning being that those old twin caps are fitted into a hole and the earth lugs bent over to make both the connection to ground and the mechanical mounting of the part.

This was all well and good in the old days but we’ve moved on since then and what would have been a chassis earth to the highest current point, resulting in noise in the higher impedance circuits, is now floating and so I can take the earth connection to any point I want.

Simple in theory but I had to then figure out how to make the machanical connection but have it isolated from the chassis but still have it close to the original point of entry so the resistors and caps around it could still span the distance. So what I did was cut out a bush in copper clad circuit board so I could solder the ground lugs to a bush then cut out an aluminium mounting plate to that so the mounting could be made. I should have photographed it because after about three hours cutting, filling and fitting it was made and I was quite proud of my efforts even though the world may never ever see it… unless, the poor bugger, years down the track who ends up owning this thing takes it into his head to break it down to do some mod or other and sees how much work I put into cramming all this stuff into such a small space… and expected it to work!
cramming
Towrds the centre of the chassis and just above the speaker magnet you can see one of the ground lugs of the aforementioned 50uf + 50uf caps. Just to the left is one of the three bolts that holds it in and around the lug you can just see the cutout in the chassis to make it available to soldering to. I’ll take another photo soon without the circuit board and with all the stuff soldered up in and around that left end of the board… oh, its going to be tight!

Life carries on…

Shit, I am so cash strapped at the moment and when I say that it means I have none and owe heaps… bugger!

Mean
while stuff like this goes on in the world

But life goes on. Had a bit of a chore cutting out the bottom of an old pot to use as a grill for the amp I’ve almsot finished. The blade kept getting aluminium on it so I’d have to stop and take the blade off and cut off the melted on slag with a really sharp knife.
deco
Still needs finesse but I like it and it may be something I could work on and get castings done which could be used for all sorts of things, guitar amps inc.

I’ve built an enclosure for the reverb amp and thats mostly done but I’ve been going hell bent building a tiny tube amp and I don’t just mean tiny in output. The chassis is 40mm x 82mm x 230mm and attached to that or inside are 3 inputs, 4 pots, 4 switches, 2 transformers, 3 tubes and a metre or so of wire plus caps and resistors etc. Its very tightly packed and I’m digging the solutions I have to come up with the get it all together. The output tubes a 6BM8 and the amp’ll be almost the same, in that regard to a 1961 Gibson GA- 5T skylark.

I got the Single ended output transformers from Johnny Pain, bassist of the H Picasso’s, when they were inside an Akai 2 track reel to reel, which decided to blow its power transformer the first time I plugged it in. The PT I’m going to use came from the last gutted chassis I got from Ben at Radio Spares and had a label on the back with the tube compliment and with a little looking up I figured it was good for about 1.5 Amps of filament power so it should cover the tubes I’m using. Just so happens as well that once tested this transformer puts out almost exactly the same B+ voltage as the skylark, within 10V anyways, so I’ll have me an interesting little amp.

The speaker will be mostly for show if it sounds like shit but it’ll have an 8 ohm line out so it’s kinda beside the point and just a bonus if it sounds any good. Okay, I’ll get a photo.
skylarkish
I’ve been back hangin’ at music electronics forums, which is a continuation of the Ampage forums of lore, and a mod came up for how to get more ‘Crunch’ from a 5E3 fender amp and some clever chap came up with a single switch to stack the two channels. I modified it slightly, and got a comp’ from one of the good ol’ boys, so I’ve got one channel with high and low impedance inputs into a 6AU6 pentode, and one other hi channel with a 6AV6, which is basically half a 12AX7, that can switch into the other channels input and make it two stage. Given theres also the third stage, which is the triode of the 6BM8, before the output that should be more than enough to get this thing howlin’.

Doesn’t look like such a tight fit in the photo eh? Well it’s actually inside that aluminium box section chassis where alot is goin’ on and I hope when it comes to the final marrying up of the circuit board to the pots and tubes… I’ll even be able to do it.

I’ve got Reverb… well almost.

I decided to add a tube reverb I made years ago to my arsenal to take to the radio show and trialed it just before I chucked all the stuff into the car for the trip into town. I wanted it just after the first booster and before the phaser and subsequent digital delay so when I was on the backwards delay I could add reverb to it, backwards reverb sounds good!

I hadn’t used the reverb for ages simply because I was never happy with it but on setting it up it gave enough of a result to be worth taking. Trouble was that the power switches were wired in upside down and because of the kinda hurried nature at the radio, the previous guys ran over then one, who plays mean cello, kinda kept me talking when I should have been setting up… so I was late, a little nervous and couldn’t figure why my reverb wouldn’t go, all the while having about 40 seconds left to get sounds so I ditched it, bypassed it, and turned it all on and got some levels. God, what a debacle it was.
I mean I did have fun with it but it was all so hurried and I talked a bit much at the beginning so there wasn’t much time for music at the end and Chris, whos the drummer extraordinaire around town, was kinda waiting to get the jazz show started…

Anyways the long and short of it all is that I took the reverb home and sat in front of it and decided it was worth the effort to either tweak up or rebuild. Conventional spring reverbs are of the fender type where a valve is connected to an output transformer, smaller than a normal one as its only driving the reverb tank, which then transforms the valves high impedance output to a much smaller impedance, 8 ohms, to drive the tanks inductor. But since semiconductors came along the folks at Accutronics in Illinois have been building higher impedance tanks to suit the outputs from opamps. I got one of those because you can actually use valves to drive them but without the weighty and expensive transformer.

But my build suffered from not enough drive to the tank and too much clean signal so it needed lots of boost, with a subsequequent raising of the noise floor, and even then wasn’t the full lush reverb wash I wanted.

With that in mind I decided on a rebuild and after having found a page devoted to using tubes on all the accutronics reverb tanks; low, medium and high impedance inputs, I decided also to change the parallel’d up medium mu (mean basically means voltage amplification factor) valve with a low mu type which, though lower in voltage amplification also means high in current amplification.
Well thats all well and good to decide to use a specific valve but what if you haven’t got one or you have a similar one that runs at another filament voltage? It’s all about choices really, working through them until the compromises suit the outcome you require. At the moment the reverb has two 12SL7 dual triodes so I was going to replace one of the valves with a 12SN7 ( which is similar to the 12AU7) but I haven’t got any 12SN7’s but I do have a couple of 6SN7’s… but the only 6SL7 I have is in an amp…?

I can use 12V valves or 6V valves as the filament supply I have on the reverb is 12V so I can parallel up 12V valves or have two 6V valves in series. I could have used a 12AU7 but those are more modern 9 pin small glass and the ones I’m currently using are octals which sit on bakelite bases and are much bigger and aesthetics are important to me.

So I made my decision to take the 6SL7 out of the moonlight amp and interchange it until another one arrives. So last night I gutted the reverb and rewired the chassis for two 6V valves in series. I’d also drawn up a schematic and etched a board to use pins in a style that predates PCB’s but postdates point to point wiring. This particular style of working allows you to change parts easily as you tweak the design.

This is a major consideration with valves because they often need various parts changed but point to point wiring, which very good for long term use, is very hard to cut into to make changes on the fly.

My next consideration is whether the back to back power transformers I have will supply enough power now that I’ve added a lower voltage amplication/ higher current amplification tube. The 12SL7’s are biased for about 1 – 2 mA whereas the 12SN7’s require at least 5mA and when using back to back transformers that small difference is quite considerable as the change fro 12V up to 240V is x20 so the current needs are also x20.

The back to back thing works where the first 240/12 transformer supplies the filament voltage and current, 6SL7 and 6SN7 require 900mA, and then you go back into the low voltage windings of another transformer and out the other end your back up to high voltage for the valve plates. The transformers I’ve got are 15VA which means Volts Amps, which is basically Watts, so 12.5 Volts, the filament voltage, divided by 15VA = 1.25 A – .9 =.35. That means I have 350mA at 12V to chuck into the next transformer. The voltage goes up and so the current goes down and . I decide to go into the 15V winding which give me a B+ of 190Vrms and a peak voltage of 270VDC. Into the 15 and out the 240 is a change of 16 so my .35A becomes .021 or 21mA… oops I’m going for peak voltage so the 21mA is divided by .7 which leaves me 7/10’s of 21 which is about 15mA which is just about enough to drive two 6SL7 triodes and two current hungry 6SN7 triodes in parallel.

This is the trouble with not having so much money. You have to do all these calculations to see whether what you’ve got will suffice while also, already having just enough, whether you can push what you have to acheive a little bit more. After all the calculations and looking in boxes and scouting about for parts I can basically rebuild the reverb and only spend about 5 bucks for parts I haven’t got in stock and also have something I can go back into easily to tweak it up.

Before photos go in, I’ll keep you waiting, I also dropped into the rockshop after the interview and had a good look at the Orange Tiny Terror and surmised that it’s size and kinda outlook would be good for an amp I’ve been planning for a while now.
OTT
It’s a valve amp switchable between 15 and 7 watts output and runs in class A. Upon getting home I found the schematic and it’s basically a Vox AC10 with a few AC15 ideas to modernise it and it’s output in class AB1 style push pull with the tubes biased really hot and into class A territory. Not quite what I wanted, but I could do it as I have a spare push pull output trannie, but I really wanna do the class A thing single ended. Much more second order, octave, distortion with SE than anything else and thats where warm, cuddly and FAT really happens with valves.

The moonlight just ain’t big enough anymore, plus I’m robbing the 6SL7 from it, and the big amp with multi channels still seems rather a task to get going so it’s definitely on the boards to make a tube amp for performing before the end of the month. Plus I’ve still got two twelve inch speakers so maybe my version of a fenderish twin, of sorts, thats actually more champish with Vox AC10 style preamp…

Incidentally I came across a Weber site that explained the difference between the amounts of ribs on these speakers and how they affect breakup. No ribs, early breakup, some ribs, medium breakup and all ribs… late breakup. My quads got all mediums, the amp I just almost finished has all ribs and I’m pretty sure the last two boxes contain no ribs… which be just right for a single ended amp. I actually want that Neil young ultra saggy and comp’d sound where the amp sounds like it’s straining sound through a three hundred year old set of gold threaded turkish courtisans fishnet stockings. Kinda shady relics as it were.

Now photos.
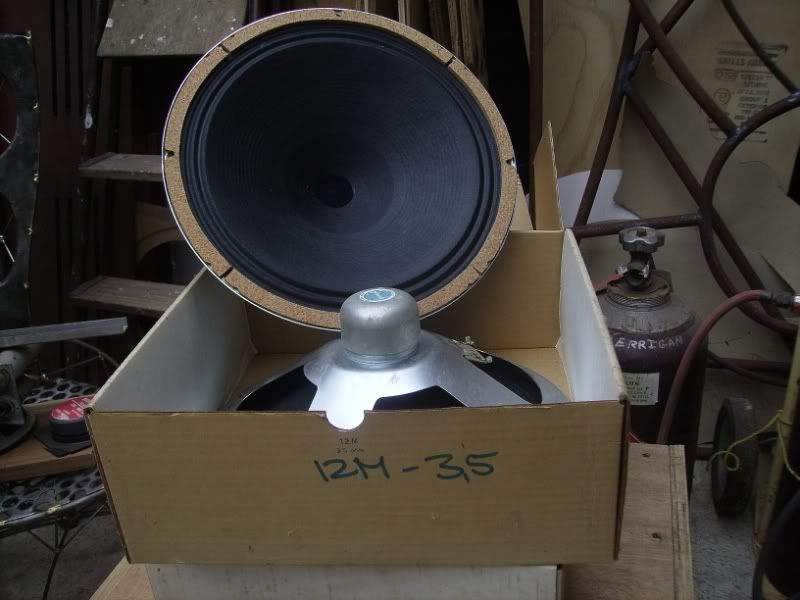
Boringest first. Two old NOS (new old stock) Plessey 3.5 ohm 12″ alnico paper, unribbed, speakers of about 10W.
maybe only 5W
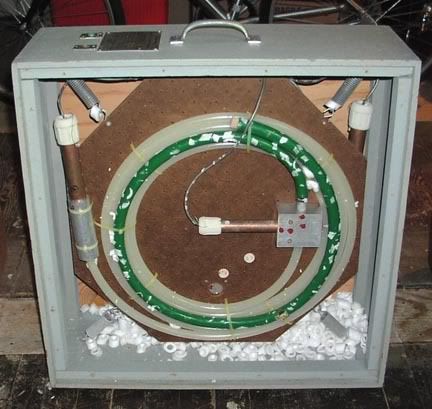
Then we have the old reverb, which I’ll box up in Macrocarpo or Kauri, and you can see in this photo that I modified the reverb tank cage so I can get access to the springs…
just like a bought one.
And in this you can see the detail of the new board, which is called turret board, because the little pins that stick up from the board are turrets, and they allow you to wind the ends of the caps and resistors around the pins and solder them on and that process makes removal and changing values quite easy and no dissemble to make tweaks. Wires then run to the pots and power supply, valves etc.
just in a days work.
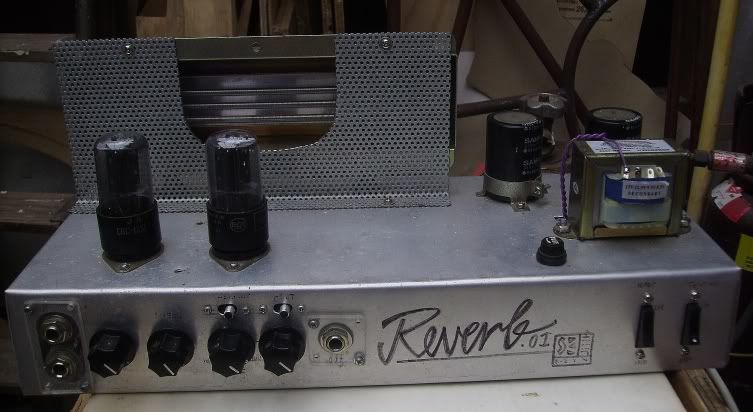
Then we have my new amp, which still needs a grill over the speaker to protect it, a set of feet and a handle for carrying it about but for all intents and purposes it is ready to be plugged in… which I still haven’t done yet so I hope it works!
magic!
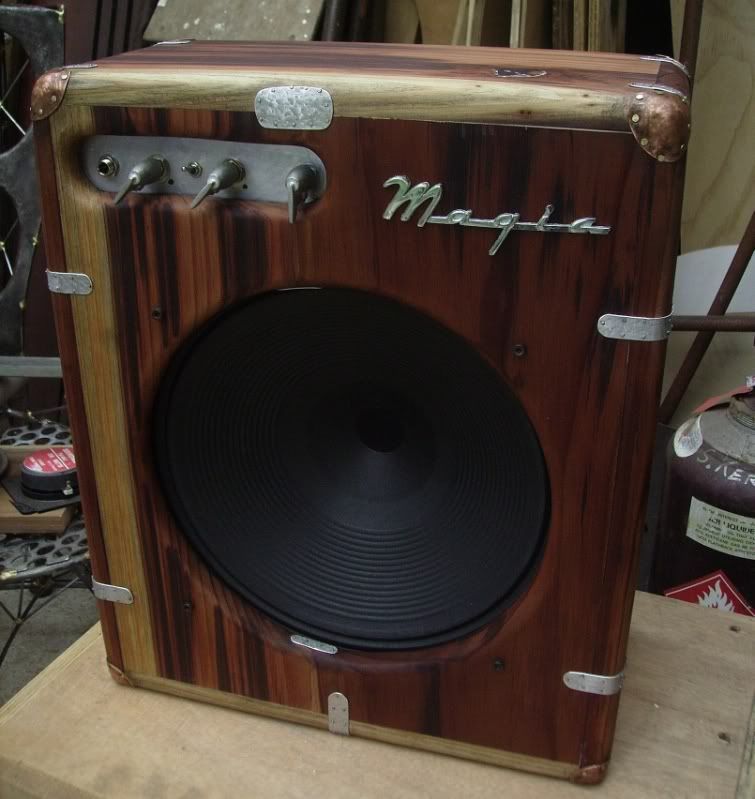
I oiled up the box with some mixture I bought years ago from the Onehunga woodwork tool shop, not quite as good as the oil I got from Patamahoe that’s long gone, but still quite nice, then dirtied it all up again after the process of making the copper corner pieces so I had to resand with wet and dry, using turps, to clean it up of all the smudges, then re-oil it. The knobs are some pewter ones I had cast up a few years ago and the magic badge? Well, like magic itself, I have no idea where I got it from and what it was about but I believe in it so it works!
Handmade.
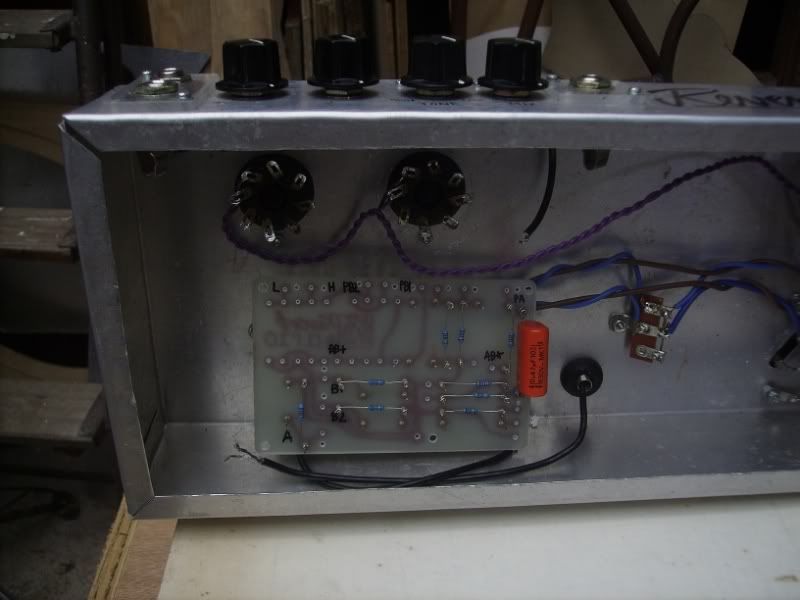
This is what it looks like from the back, and after reading the Pignose patent notes a few days ago, I’m thinking of covering the rest of the back with a hinged cover, like a window with catches and stuff, so I can set the amount of energy that comes out the back.
fishermans friend.
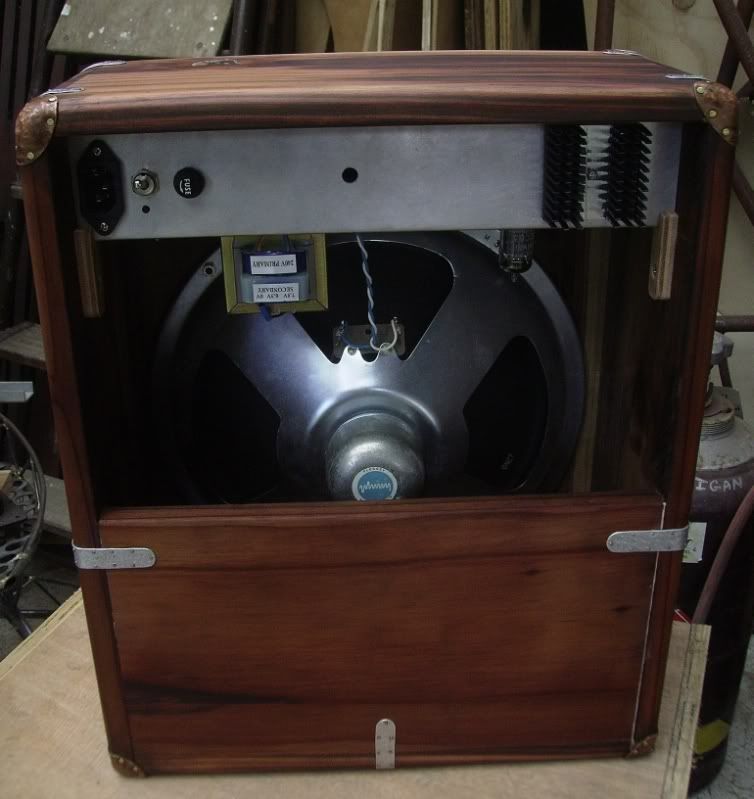
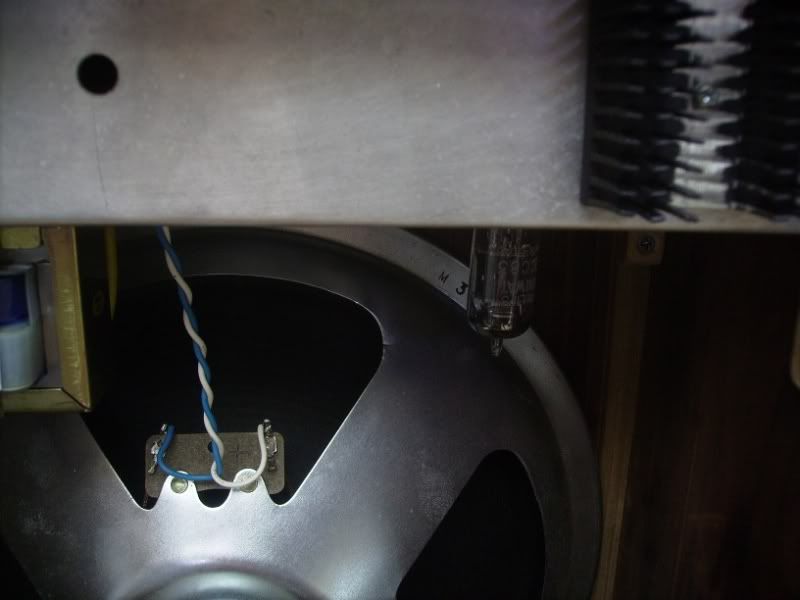
And if you look closely at the above photo you can just see the ECC83 phillips, made in Holland, thermionic valve, but I’ve made it easier (see below). The only thing that concerns me about this build is that B+ and the filament voltage come on at the same time which can mean cathode stripping because the filaments take 11 seconds to warm up and as this happens the plates are at high voltage almost straight away so electrons are immediately ripped from the filament winding and this isn’t a good thing.
glassy bottle beautiful.
Down the bottom of this page , though he doesn’t say it straight out, is a possible way to solve the cathode stripping problem ( thats why valve amps have the extra switch to allow the filaments to warm up before the B+ is turned on; standby). He puts an LED above or below the plate resistor which takes a few seconds to come on and this alleviates the cathode stripping somewhat. Hard to believe you can pass 250V + accross a part that won’t take more than 2V but if he says it’s so then it must be true. It is just a diode though and the fact it not at eart then… I’m just wondering about the current.

So there you go. The valve Wizards pages are very good for understanding how to use valves and how to set them up optimally once you’ve done the background reading ( the .pdf’s by Norman H Crowhurst at Audioexpress.com) and the next one I’ll be into, after the SE amp is the SRPP thing at the bottom of the linked page to fire a bunch of low impedance reverb tanks I have from old amps and organs.